Showing posts with label chalkboard paint crafts. Show all posts

Tuesday, June 12, 2018

How to Upcycle a Child's Suitcase

June 12, 2018 0 Comments
I painted one half of my child sized suitcase with blackboard chalk paint. Then I decorated this side using liquid
 chalkboard paints. The doll drawings may be found on this page of my blog if you would like to draw them on
your version of the craft. Also there is an older post describing the "chalk transfer method" that I used to
design the top half of this chalkboard painted luggage here. The text above on the suitcase reads,
 "Home is where your friends are!"
       I decided to combine two distinct craft projects into one in order to save money on supplies. Namely the suitcase, because these are getting a bit expensive to acquire from resale outlets. The lower half of my suitcase has been decoupaged with vintage sailor fabric and the upper half with chalkboard paint.
This little upcycled suitcase is home to many doll house dolls.
Supply List:
  • chalkboard spray paint (black)
  • white school chalk
  • liquid chalk pens
  • Mod Podge
  • large soft brush
  • scissors
  • butcher paper
  • vintage fabric (your choice)
  • ruler
Step-by-Step Directions: Part 1. The Decoupaged Suitcase Surface
  1. Before you begin, clean the outside of your suitcase with a moist bleach towelette and set it in the bright sunlight. This will kill mold and bacteria. 
  2. Gently sand down the flat surfaces of the luggage so that glue and paint will bond to it with ease.
  3. I decoupaged the bottom half of my little suitcase first, for obvious reasons. I wanted the more durable alteration to be on the half that would receive the most neglect and would not be put on display as often.
  4. You will need a paper pattern to lay on top of your vintage fabric. Allow a slight 1/8th seam allowance after tracing around the pattern on the wrong side of your fabric. This extra fabric will get tucked between the piping and the bottom side of the suitcase after you apply the Mod Podge.
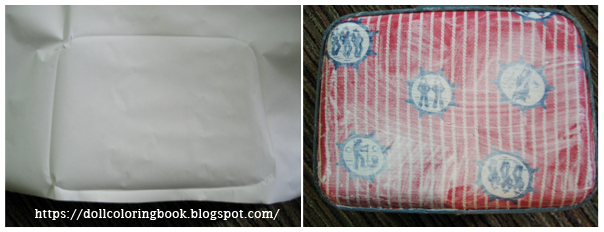
  5. To make the pattern from the actual suitcase top, lay butcher paper across the flat side of the luggage and push with your finger tips around the inside circumference of the suitcase piping. This will leave a obvious crease in the paper that you can cut on top of directly with a pair of scissors. (see photo below)
  6. Brush the clean, sanded surface with a generous amount of Mod Podge. Use a large paint brush to do so with speed.
  7. Now, carefully line up the fabric and press it evenly on top of the glue, working the creases out with a long ruler and your finger tips.
  8. Brush on a second thick layer of Mod Podge to the top of my fabric in order to seal the surface thoroughly. Let the luggage stand and dry thoroughly before moving on to the second half of this craft project.
 Cover the outside of a suitcase with decorative fabric.

More Altered Suitcases for Children:
This suitcase has two sides, on the left is the chalkboard painted side and on the right is the fabric decoupage side.
Above are photos of the drawing done with a liquid chalkboard marker on my child sized suitcase.
Step-by-Step Directions: Part 2. The Chalkboard Painted Surface
  1. Like the decoupaged surface, the spray painted surface needs light sanding in order for the paint to adhere properly.
  2. Cover all of the surfaces that are not to be painted with masking tape and newsprint.
  3. Lay the suitcase face up and closed in the center of a large cardboard box. This will protect your environment from floating paint.
  4. Spray the chalkboard paint in even, thin coats. Repeat this after allowing each application to dry, approximately 25 minutes between coats in the sunshine, outdoors. I painted my suitcase top with at least four layers of paint.
  5. Let the project dry thoroughly over night.
  6. Now the chalkboard surface is ready for drawing with liquid chalk pens! Liquid chalk may be wiped down with a moist cloth. 
  7. To save work that you like, you can apply a couple of coats of spray fixative.
Homes For Dolls Inside Vintage Luggage:
    The dolls that live & travel inside the suitcase thus far...
    Old Fisher Price doll house dolls.
    My little ponies plus one unicorn.
    Tiny Madame Alexander Dolls from The Wizard of Oz Collection.
    Vinyl Career Figures from Kaplan Co.
    A tiny cartonería doll from Mexico.
    Cabbage Patch Kids figurines.

    Update a Classic Pull-Cart With Chalkboard Paint

    June 12, 2018 0 Comments
    Above is an easy toy transformation that any older sibling or parent might accomplish in just one, sunny afternoon.
    A classic, wooden pull-cart for baby blocks by Melissa &
    Doug may be used for this easy DIY craft. I purchased the
    one pictured above, for only $1 in a local thrift store.
           You may have seen a pull cart like this one in resale for a dollar or two and wondered if it might be made useful again? They are usually tossed out after a year or so, when baby no longer seems interested in pulling his blocks up and down the hallways.
           Here is an idea to extend his interest in the cart and you probably have most of the supplies needed stored in your garage at home!

    Supply List:
    • chalkboard spray paint (any color)
    • masking tape
    • newsprint
    • large cardboard box
    • a wooden pull-cart (mine was purchased from resale)
    • blocks
    • chalk
    • soft old rag
    • red acrylic paint to touch up the wheels of my cart
    • sand paper
    Step-by-Step Directions:
    1. Clean and sand the pull-cart to prepare it for painting.
    2. Use masking tape and newsprint to cover areas that you don't wish to be sprayed with chalkboard paint. I only chose to spray paint the inside, bottom of my wagon.
    3. Now set the wagon inside a large cardboard box to protect the surrounding environment from spray paint as you work. I spray painted my little block wagon outdoors.
    4. Spray three to four even coats of chalkboard paint in order to get nice, durable coverage.
    5. Let the wagon dry overnight.
    6. Remove the masking tape and newsprint. Then repaint the wheels with red enamel paint if these are scuffed up.
    7. Now you can use chalk to trace around a variety of block shapes and sizes that are in your toddler's collection. Challenge him or her to match the shapes and call these by name while they play this simple game.
      Ideas like these help parents to recruit family members in the practice of teaching primary learning activities
      to babies and toddlers.

        Watch Steve Ramsey build a classic wooden pull-cart
        for toddlers. He links to a free set of plans too from
        Mere Mortals.

        Chalk Transfer a Parking Lot & Service Station

        June 12, 2018 0 Comments
        It's easy to learn how to design a place
         for Hotwheels to go for a tune up,
         tire adjustment or serious car repairs.
               I used a simple chalk transfer method in order to compose a service station/parking lot for any child sized, chalkboard table top. (See full sized table below.) You can print out a service station like mine from my car mat coloring page collection at Crayon Palace.
               You will need both regular white chalk and a liquid chalk pen to complete this craft project.
               If you do not have a chalkboard table it's easy to remedy this by spray painting the top of an old sofa table with chalkboard paint; but that project is for another post!

        Steps for The Chalk Transfer Method:
        1. Print or draw a design.
        2. Rub the backside of the drawing with white chalk.
        3. Turn it over drawing side up and position it on the chalkboard.
        4. Use a pencil to trace the basic outline of the drawing.
        5. The chalk should transfer onto the chalkboard. It should appear fuzzy.
        6. Outline the final drawing with a chalk pen.
        7. Dust off the surface using a soft brush.
        More Chalkboard Surfaces Crafted for Car Play:
        More Crafty Fun With Little Cars:

              Photographs of my friend's chalkboard table. I spruced it up a bit with a new coat of chalkboard paint and a chalk drawing for little cars. When his children tire of this; he can wash off the table top and start over.

           I needed to give this little chalkboard table a fresh coat
           of paint before drawing my service station and parking lot.
           It was apparently, well loved. I thought the pencil table
           legs interesting.
          I purchased these two slat bottom, kiddie chairs at resale for three dollars each.
          Above is a close-up shot of the "Service, Fast - Service Station"
           from the 1950s, drawn with a liquid chalk marker.
          The chalkboard painted parking lot is almost full.
          I gave the parking spaces numbers; this is a good opportunity to
           teach counting and number identification with a toy.
          I included a flower bed at the front of my chalk drawn service station.
          The parking lot as seen from above.
          The empty parking lot and little car service station
          wait to be played with.

          How to paint a child's chalkboard table.

          Monday, June 11, 2018

          Chalkpaint a Wooden Slat Basket

          June 11, 2018 0 Comments

                 I sprayed the end surfaces of this wooden slat basket with chalkboard paint. Then I used chalk liquid markers to hand letter, "Aa is for Apples" on one side of the basket and "Bb is for Berries" on the opposite end. Then I lightly outlined apples and strawberries before coloring them in with pastel chalks.

                 Above you can see that I carefully wrapped the parts of this stained wooden basket that I did not want to spray paint with masking tape and newsprint. This keeps the surfaces clean and neat.
                 I prefer to use the spray paint version of chalkpaint because there are far fewer drips to clean up!


                 I will use this little basket to decorate a market stall in the nursery. Above you can see that I have purchased a few plastic apples and below are the plastic strawberries that I will include inside the basket.
                 Even though the little ones who play with this pretend food can not read, it is good to expose them to as much print as possible. Over a short amount of time they will make connections between the words and items these refer to.


                 I also used a bit of fixative to help keep my chalk drawings from smearing and rubbing off on cloths. If I should decide to make these designs permanent, I will give them heavier coats of fixative and then a final coat of acrylic varnish. 
                 This sweet little basket would make a lovely gift for a child on her birthday. Fill it up with chalks, a felt eraser, and a little bundle of plastic fruits or flowers so that she may make up her own version and decorate the sides of the basket as she pleases.

          Follow Us @soratemplates