Showing posts with label sewing for your dolls. Show all posts

Friday, October 12, 2018

Quick and Easy Skeleton Costume for a Doll

October 12, 2018 0 Comments
How to make this doll's costume from recycled plush and plastic.
       This is a good idea for reusing some of your old holiday plush. Why not unstuff it and make quick doll costumes for a doll's party? It takes so little effort and the results are inspirational. Before you know it, you can create an entire cast of characters for a doll play, parade, or trick-or-treat adventure.
Above is the skeleton novelty plush and skull
with plastic arms that I used to make a quick,
simple doll costume for Barbie and Ken's son.

Supply List:
  • small sharp scissors
  • snap or Velcro
  • black ribbon or seam binding tape
  • stuffed novelty plush
  • plastic skeleton parts
  • threads to match
  • No-Fray (optional)
Step-by-Step Instructions:
  1. First measure the length and width of a doll that you wish to make this costume for. Compare these measurements to the length and the width of the stuffed novelty plush. Are the two similar? If so, you will be able to un-stuff the plush and use it for your doll.
  2. Next, you will need to use small sharp scissors to clip off the end pieces of the arms and legs. Try to remove very little of these and tack their edges under using a threaded needle, if possible.
  3. Clip off the head of the skeleton as well so that your doll may be fitted properly to the costume. You will also need to clip a 1'' seam down the backside of the plush in order to work the doll in and out of the body suit.
  4. Remove all of the cotton filling from the plush.
  5. I folded a small black ribbon around the edge of the opening in back and ran this up along the neck and back down the other half of this cut, sewing it in place with a black thread and needle so that the raw edge would be covered. Raw edges can tear and run after just a small amount of use, so these must not be ignored. You could use a No-Fray or No-Sew glue around these raw edges if you finishing such tiny seams is too difficult or time consuming for you.
  6. Attach a snap or a piece of Velcro at the back to hold the costume closed while your doll is wearing it.
  7. I cut the arm bones from the plastic skeleton, (above right), with a sharp pair of scissors.
  8. Then I threaded a sharp needle with twine and attached a piece of it to either side of the skeleton's mask so that I could tie it at the back of my doll's head with a simple knot and bow. Now this boy Barbie doll is ready to go trick-or-treating with his doll parents or perhaps he can wear the costume to a party or march in a Mardi Gras parade!
In this video, learn how to make: a skeleton, ladybug 
and pumpkin doll costumes for your 18" American Girl dolls.

More Trick-Or-Treat Fun:

Saturday, September 29, 2018

Sew Bean Bag Chairs for Your Doll

September 29, 2018 0 Comments
Rachel and her twin sister, Rosie, are lounging
on their bedroom bean bag chairs.
       These bean bag chairs are sewn using fleece so that the material will not unravel while a young crafter is working with it. I used solid, bright colors that will blend into the colors of the twin's bedroom. However, these chairs can look very different depending upon the material you select for them. 
       In the past, I have seen people stuff them with perishable products like beans and rice. I would not recommend that you do this because these food stuffings will attract pets, mice or insects to your doll collections. If you do not have the pocket change to purchase plastic pellets, the best alternative is cotton batting.
Cut pieces for the bean bag chair are marquise shapes.

Supply List:
  • matching threads and needle
  • plastic pellets to stuff the bean bag chairs with
  • felt or fleece scraps
  • pattern (below)
Step-by-Step Instructions:
  1. Download and print the free pattern below.
  2. Cut out the marquise shape and pin it directly to the fabric of your choice. Repeat this step 6 times.
  3. If you are using a no-fray fabric like felt or fleece, you don't need to include a seam allowance.
  4. Sew two sides together from tip top tip until you have sewn all of six marquise shapes together leaving an opening of inch so that the bean bag may be turned right-side-out.
  5. Stuff the bean bag chair with plastic pellets and then sew shut the small opening with a invisible stitch.
  6. Sew on the flower shapes using either a whip stitch or a blanket stitch on each end of the soft chairs.
Left, the twins are enjoying their new bean bag chairs. Center, the cat likes them too. Right, time for hide and seek!

Free pattern for a flower bean bag chair.

Friday, September 28, 2018

DIY Conical Hats for Fashionable Princesses

September 28, 2018 0 Comments
Learn to craft colorful, fancy cone shaped hats for each of your fashion dolls.
Trim them with silks, ribbons, embroidery etc...
The conical hats are called hennin;
 read more about them at Wikipedia.
Above, Hans Memling's painting of
a young woman with a black velvet
lappets and a conical shaped hat.
       The headdress in the shape of a cone or "steeple", or truncated cone were worn in the late Middle Ages by European princesses and women of the nobility. Various writers on costume history use hennin to cover a variety of different styles. Almost all agree that the steeple-cone style was the original hennin. You can make these theatrical looking princess hats for all of your Barbie dolls!

Supply List:
  • cardboard
  • masking tape
  • hot glue gun and hot glue
  • needle and matching threads
  • silk scraps, scarfs, transparent fabric scraps
  • ribbons to match
  • cotton balls
  • tacky craft glue 
  • one large paper clip
  • decorative thin silk ribbons (8 inches per hat)
 Step-by-Step Instructions:
  1. Download and print out my pattern below. Cut the pattern out.
  2. Trace around the hat pattern onto a stiff piece of cardboard and cut this out.
  3. Roll and shape the cardboard into a pointed cone and glue it with the tacky craft glue
  4. Use a paper clip to hold the cone together while it dries.
  5. Cover the entire cone with masking tape. This will hold the steeple shaped hat into place should it get wet during play.
  6. Stuff the inside tip of the cone with a cotton ball to help the cardboard keep it's peeked shape.
  7. Cut a piece of silk fabric slightly larger than the pattern provided, approximately 1/4 inch around.
  8. Roll this around the cone with it's right side facing the cone. Pin the edges together.
  9. Sew a straight seam up the side of the fabric to a point.
  10. Remove the silk cover and turn it inside out so that the straight seam is now on the inside of the fabric cover. 
  11. Now insert the cardboard form and hot glue the lower edge of the fabric to the inside of the cone neatly all the way around the edge of the hennin.
  12. Cut two squares of veil fabric to attach to the top of the hennin with a needle and thread. These square may be as long as you like. 
  13. Pull the threaded needle through the centers of each square to neatly layer these together while attaching them to the tip top of each covered hennin.
  14. Hot glue a ribbon on each side of the conical hat so that you can tie it onto the doll's head securely. The ribbon should measure approximately four inches in length on each side of the doll's head.
Barbie wears a gold lamé hennin with a sparkly star veil to compliment her pale pink dress trimmed with gold and white accents.
Each of our fashion dolls have hennins to match their princess gowns.
There are three versions photographed here in hot pink, purple and gold lamé.
This lovely princess wears a steeple headdress trimmed with embroidery.
Above is a free pattern for the body of the hennin.
 Measurements for the veil are included in the instructions above.
A cone shaped princess hat DIY 
tutorial from Chelly Wood.

Thursday, September 27, 2018

Spaghetti String, Summer Top for A Curvy Fashionista

September 27, 2018 0 Comments
This sweet little summer top is finished off with tiny blue embroidered flowers. I cut and attached these
 from a repurposed kerchief. This baby sock fits my curvy Barbie perfectly.
       This summer top with spaghetti string shoulder straps was made from a recycled baby sock and a bit of embroidery transfer. The cuff of the sock is used here as the waist edging on the doll. The toe of the sock was cut away and the raw edges were finished with a tacky white glue. As soon as the edges were dry, I finished these with blanket stitching all along the top of the garment. Then I attached some yarn at either shoulder to act as my spaghetti string straps.

Sew Sock Slacks for Fashion Dolls

September 27, 2018 0 Comments
Each pair of sock slacks have cute little belts made from
embroidery floss and beads.
       Make cool weather slacks for your fashion dolls from recycled long ribbed socks. Our versions may be made either by hand or on a sewing machine if you prefer.

Supply List:
  • ribbed socks: grey or charcoal
  • white embroidery thread
  • regular thread
  • tacky craft glue or no-fray 
  • beads
  • long paper tube
Step-by-Step Instructions:
  1. Measure the length of your doll's legs and add two additional inches to approximate the length between it's belly button and it's crotch.
  2. Cut this measurement from the top of a ribbed sock down.
  3. Turn the sock clipping upside down so that the finished edge becomes the bottom edge of the slacks.
  4. Insert a long paper tube inside the cut sock so that you can apply tacky or no-fray along the clipped edge without the glue coming in contact with any other surface. Let it dry.
  5. Remove the tube.
  6. Now measure approximately two inches down from the waist edge and mark this point with a stick pin.
  7. You need to then sew two straight seams down the center of your sock approximately 1/4 inch apart. You can do this by hand or on a machine. Sew over these seams again to insure that these are tight.
  8. Take a sharp pair of scissors and cut between the two rows of straight stitching to form the right and left sides of your doll's slacks.
  9. Hand-stitch the two rows of straight seams together just above the crotch.
  10. Turn the slacks inside out and finish the top waist edge with a blanket stitch using embroidery floss.
  11. Fit the sock slacks to your doll by sewing a long piece of embroidery floss around the waistline with a large straight stitch.
  12. Tie off each end with a bead so that the slacks tie won't slip out of place.
  13. Tie the floss belt in an attractive bow.
Left,
sew two straight seams down the center of your sock approximately 1/4 inch apart. You can do this by hand or on a machine. Sew over these seams again to insure that these are tight. Center, Take a sharp pair of scissors and cut between the two rows of straight stitching to form the right and left sides of your doll's slacks. Right, Hand-stitch the two rows of straight seams together just above the crotch.

Thursday, September 20, 2018

Sew a Jersey/Sweater for Ken or Barbie

September 20, 2018 0 Comments
This striped sock sweater/jersey includes a turtleneck collar and ribbing on both the sleeves and around the waist.
This sock sweater requires two socks in order to include the stripes and ribbing on the sleeves.
 This jersey (above) is sewn from a pair of socks. Sewing with sock can be tricky but the results are very pleasing. Some tips to remember:
  • Sew with very small stitches and sew over your stitches several times to prevent unraveling.
  • The clothes only look as good as the socks, so, use either new or like-new socks to begin with.
  • Choose interesting patterns and colors that suite the age your doll represents.
  • Try to avoid stretching the socks while you work with them. This will prevent oddly shaped garments.
  • Use very strong thread for sock crafts such as these. Sometimes I will even use dental floss to sew with knit materials for dolls.
  • Use a sticky craft glue or no-fray fabric glue when working with the knit socks to prevent unraveling. 
  • Whether you use one sock or two to sew a doll's sweater will depend upon the pattern, design or size of your doll. Continuing the design of the sweater across the chest and onto the sleeve is a matter of design preference.
The candy stripped sock sweater above includes ribbing
around the waist only; plus a tiny knit belt. See directions
for her sweater skirt here.

       For this particular version of a doll sock sweater, (right) the cuff of the sock becomes the finished edge of the doll's sweater waist. The cuff provides a natural elasticity for the sweater so that the garment possess some durability when a child dresses and undresses her doll.
      There is also a tiny knit belt, cut from the former sweater. If your recycled sweater does not have a detail like this one, simply cut a bit of knit twine or decorative yarn to tie about the doll's waist instead.

Supply List:
  • a pair of clean larger socks for Ken's sweater, one child's sock for Barbie's sweater version
  • needle and strong thread (Use dental floss, unwaxed if you have it.)
  • matching pale pink, cotton thread
  • tiny sharp scissors
  • a doll to measure by (I used a ken doll, made by Mattel and a lovely dark skinned Barbie.)

Step-by-Step Directions:
           Cut the child's sock into three separate pieces, two identical sleeves for the arms (from the foot of the sock) and one continuous piece for the torso of the doll, cut from the leg of the sock. (see photo below) Then thread your needle with the dental floss and sew both a straight seam and then a blanket stitch up the sides of each sleeve leaving a opening for the shoulder at the top of each sleeve and an opening at the bottom of each sleeve for the doll's hands to stick through. Sew a straight seam and a blanket stitch across the top of the neck line leaving a hole for the doll's head to fit through. The cuff of the former sock becomes the waistline opening and it is left open all the way across.
       
             Observe in the pictures below how the heal part of the sock (gusset) is left to shape the shoulders of the sweater. It is easy to notice this here because the heal of the sock is solid pink along with the waistline area. You can also observe from the close up shots that I have turned the collar back and stitched a tiny blanket seam around the neck opening.  This stitch prevents fraying, allows for elasticity, and makes an attractive, finished edge.

             To sew on the sleeves you must take a tiny pair of sharp scissors and cut out a small arm whole on either side of the sweater just below the shoulders. Be careful not to cut these openings too wide. As you sew the arm seams these openings may be stretched a bit.


             Turn the sleeves right-side-out so that the front sides are facing together as you sew around the arm whole seams. See the photo below on the far right. In the Center photo, you can see that the sweater when turned inside out, it should have all muted colors and when the sweater is turned outside in, the colors are all brilliant.
             I finished the bottoms of each sleeve on this pattern by gently rolling them up and tacking them down with a bit of cotton thread and a blanket stitch.

       Above is a no-sew process for making a sweater for Barbie. 
      This process uses a hot glue gun. Only older children should
      be allowed to use hot glue guns and even then, they should
       be watched by an adult.

      How To Sew a Straight Knit Skirt for a Fashion Doll

      September 20, 2018 0 Comments
      Barbie Doll dressed in knit top, skirt and faux leather boots.
      Click here to see how to sew the sweater.
             Knit doll clothes cut from recycled sweaters and socks can be finished in such a way as to prevent future unraveling to some extent. However, you must treat the clipped ends of the knitted stitches with a fabric glue or tacky glue!
             These clipped ends must also be sewed securely, making sure to pass a fine needle back through each row of the knit and firmly sewing shut any stitched seams with several tight lines of straight stitches.

      Supply List:
      • sleeve from a knit sweater (recycled clothing)
      • needle and thread to match
      • tacky, white craft glue or no-sew fabric glue
      Step-by-Step Directions:
      1. Cut a clean, laundered sleeve from a knit garment. You can cut two knit skirts from an adult woman's size sweater for one 11 1/2 inch doll.
      2. Lay the sleeve out on a clean flat surface to cut. Lay your fashion doll on top of the sleeve to measure the length you would like to cut for her skirt. This measurement will vary given the size of your doll.
      3. I cut the top of the skirt from the finished bottom of my sweater's sleeve. That way, the doll's waist will be finished and less likely to unravel over time.
      4. Sew a straight stitch down the side seam of the skirt. Repeat this again, layering several seams on top of each other.
      5. For the unfinished, clipped end of the skirt, insert a tube or a group of pens to hold the tube of knit open temporarily while tipping the edge of the garment with glue. Let the glue dry this way and then pull the pens or tube out.
      6. I used a blanket finishing stitch around the bottom of the skirt on top of the glued edges to ensure the skirt would not unravel for some time.
      Left, the sleeve of a knit sweater is cut off the main body of the garment in order to make the measuring and cutting
      of my doll's skirt easier. Center, here is a photo of pens inserted inside the raw end of a cut sock. This is how I hold
      open the clipped edges of a knit garment in order to apply a fabric glue to each end. You don't want the fabric to sit
      on top of anything that it might adhere to during the drying time of the glue. Pull these pens out after the glue
      has dried. Right, the bottom finished edge of the skirt has an additional seam sewn through its edge on top of the glue. 
      Left, here you can see the top edge of the doll skirt is actually the finished portion of the former knit sleeve that
      it was cut from. Center, the bottom edge of the skirt is hand-stitched over with a tiny, tight blanket stitch using
       matching thread. Right, this knit skirt will last considerably longer than most, given the attention paid to finishing
       it's edges.
      How to apply a fabric glue to the ends of your 
      clipped knitting in order to prevent fraying.

      Thursday, August 23, 2018

      Sew A Set of Towels For A Doll House Bathroom

      August 23, 2018 0 Comments
      A new set of towels for Barbie's friends.
             I think that our family's dolls will agree that there is nothing nicer than a new, fresh set of towels! I chose a couple of brilliant azure blue, terry cloth, hand towels from a local dollar store to cut apart for this simple craft.

      Supply List:
      • terry cloth
      • trims for hand towels
      • needle and threads to match 
      Step-by-Step Directions:
      1.  You may wish to straight stitch the sides of your doll's towels on a machine or by hand. I turned and straight stitched every side for both the bath towels and hand towels. However, I didn't bother with the tiny wash cloths. 
      2. Add a little extra trim to the ends of the hand towels. I decorated each of my solid color hand towels with a white floral embroidered lace. 
      3. The bath towels measure 4 1/2" x 11". The hand towels measure 2 1/2" x 5 " and the wash cloths are 2 1/2" x 3" each.
       Sew more towels for your doll:
      I purchased the terry cloth for this set of towels from a dollar store; it was far less expensive than the terry cloth
       sold off of a bolt in a fabric store.

      Sunday, August 19, 2018

      Refinish Wicker Doll Furnishings

      August 19, 2018 0 Comments
      The finished result after a couple hours of spray painting.
             In the 1970s and 1980s, it was popular to furnish doll houses with small wicker furniture; the alternative to plastic inflatables. Because wicker is not very strong, much of it did not survive the playtime I suppose.
             I picked the stool, side table and one chair on the first day and then I returned the following day to retrieve the second chair. When visiting resale in the city, I always return the day after I have purchased something in order to see if it is a part of a larger set. Doll furniture in specific, was and still is sold in sets from high end toy stores. By the time these little furnishings are donated by former owners, many pieces may be lost or shifted into multiple bags or boxes.
             I have also discovered that employees in my local resale shops, do not always put sets of doll furniture out on display all at once and they don't always bag these items together. So it is best to keep a close watch for matching items once you have discovered one piece that you want.

      Old wicker doll furniture tossed out as trash. These items
      will look great once they are repaired and repainted.

      Supply List:
      • old wicker doll furniture for upcycling
      • your choice of spray paint 
      • terry cloth towel
      • dark green acrylic paint (for metal leaf design)
      • fabric print to compliment the paint color
      • two buttons
      • needle and thread
      • hot glue gun and hot glue (repair work)
      • cotton or polyester stuffing
      Step-by-Step Directions:
      1. Wipe down the old wicker with a clean terry cloth towel; try to remove as much dust and dirt as you can before painting these.
      2. You may need to use a bit of hot glue to reweave some of the old wicker back around the arms or chair legs and tack it into place.
      3. Prepare to spray paint this furniture in an outdoor space. I use large old cardboard boxes to spray paint items in. The clean up of these is easier; all I need to do is toss the used cardboard into recycling after the painting is done. The sides of the cardboard box help prevent the paint from coming into contact with anything beyond the object I am spray painting.
      4. When spray painting wicker, it is best to do so very slowly, all the while turning the doll furniture from side to side, upside down and right side up as the wicker dries. It take many light coats of paint and spraying between the gaps takes time. But the results are like new!
      5. After coating the wicker entirely and letting the paint dry, I then used a small paint brush to apply some darker green acrylic paint to the decorative metal leaves at the foot of the stool. This step highlighted the raised areas in the stamped metal.
      6. To make the two tiny pillows, simply draw a circle pattern for the seats and trace it out onto a fabric four times. Make a seam allowance of 1/4 inch around all four circles before cutting the fabric. 
      7. Cut and sew a straight stitch around the circles with their right sides facing in. Leave an opening for each pillow of about 1 inch wide.
      8. Now clip around each pillow's edge to help turn them inside out properly. Be careful not to clip through the straight seam!
      9. Turn the fabric pillows inside out and stuff them with a little bit of cotton or polyester stuffing.
      10. Use a whip stitch to sew shut the opening.
      11. Thread the needle again with a matching thread and sew a button each into the middle of both pillows.
      Left, I use large old cardboard boxes to spray paint items in. The clean up of these is easier;
      all I need to do is toss the used cardboard into recycling after the painting is done.
      Center, It take many light coats of paint and spraying between the gaps takes time.
      Right, the results are like new!
      Left, I used a small paint brush to apply some darker green acrylic paint to the decorative metal
       leaves at the foot of the stool. This step highlighted the raised areas in the stamped metal.
      Center, I chose to sew tiny pillows for each chair as well. Right, Each pillow has a decorative
       button sewn in the middle.
      This is the same exact furniture that I have restored above. 
      However, these pieces are in excellent condition.

      Saturday, August 18, 2018

      Update A Wooden Doll's Cradle

      August 18, 2018 0 Comments
             I picked this small wooden cradle for our fashion doll's house not only because I thought it charming but also because it rocks well without tipping. It is an excellent size, 8"x4"x4", for a Barbie doll's baby. All this piece needed was a bit of updating!

      Above, I painted this little cradle using two colors, green and teal, and left a few of it's surfaces stained.
      This style of furniture is comely referred to as "two-toned." Although, technically my cradle has three
       colors on it. The word combination "two-toned" refers to the leaving of some surfaces stained
      and others painted.
      Detail of bumper pad tacked in place. See
      the coordinating changing table I crafted to
      match this doll cradle for Barbie here.
      Supply List:
      • acrylic paints
      • cardboard
      • felt for lining, any color
      • scraps of fabric for the bumper pad
      • fleece for mattress cover, coordinating color
      • needle and thread
      • clear acrylic sealer 
      • sand paper 
      • small paint brush
      Step-by-Step Instructions:
      1. Lightly sand the cradle's surfaces to remove dirt, grime and any other sticky or oily residue from the crib. This light sanding will also scratch the surface of the stained crib just enough to help the acrylic paints adhere to it.
      2. Using a small paint brush, carefully coat the different surfaces of the crib with the colors you have selected. It should take three to four coats of paint to cover each surface sufficiently. Remember to apply the paint evenly to avoid messy lumps and drips. 
      3. I painted this little cradle using two colors, green and teal, and left a few of it's surfaces stained. This style of furniture is comely referred to as "two-toned." Although, technically my cradle has three colors on it. The word combination "two-toned" refers to the leaving of some surfaces stained and others painted.
      4. Now you may wish to use a clear acrylic sealer to protect your paint application. Let it dry before continuing.
      5. Measure and fit a piece of cardboard to fit inside the cradle, if your cradle has a bottom made from small wooden slats like mine.
      6. Cut a felt cover for this cardboard mattress the exact same dimensions. Glue it to the top of the cardboard.
      7. Now cut a piece of fleece, slightly larger to cover both the top and bottom of the cardboard. This will provide the doll with a bit of cushion. 
      8. Tuck and whip stitch the edges of the fleece to cover the cardboard mattress. Fit this into the cradle.
      9. To make the cradle's bumper pad, measure the length of four interior sides. Add up these measurements and cut a piece of felt for the stuffing of the bumper pad.
      10. It's up to you to decide how wide the bumper pad will be.
      11. Place the felt piece on top of the decorative fabric you are going to use for the outside of the bumper pad. Cut around this felt piece leaving 1/4 inches for a seam. Do this twice.
      12. Remove the felt for measuring, Turn the two pieces of fabric with right sides together. Sew a straight seam around the two bumper pads, leaving a opening of approximately three inches.
      13. Insert the felt lining and whip stitch the opening shut.
      14. Stitch the ends together if you like.
      15. Now fit the bumper into the little cradle and use a needle and thread to tack it in place.

        Monday, July 30, 2018

        DIY Pet Beds for Your Doll's Dog or Cat

        July 30, 2018 0 Comments
               Covering doll furniture with cotton and fabric is not as difficult as it looks. However, it does take a bit of practice and patience! After awhile you will get used to the process and improve greatly as you go. Start with something simple, like a tiny bed for Barbie's pets.
        Barbie and Ken have many pets, so they need to have pet beds for both
        dogs and cats.
        These little cats sleep in the utility room so we've trimmed
        out their bedding with yellow calico to match the decor of
        the doll's utility room.

        Supply List:
        • Calico scraps and matching felt colors
        • cardboard
        • hot glue and hot glue gun
        • needle and thread
        • oval sponge (one cut in half or two separate)
        • masking tape
        • four beads of equal size for each bed
        Step-by-Step Directions:
        1. Purchase your round sponge first before cutting or measuring any of the materials for this project. I cut my sponge in half to make two beds. However, you may decide to use two separate sponges for each bed instead. Cutting a sponge in half is not very easy to do. 
        2. Choose your pet's bed fabric to coordinate with other furnishings inside in your doll's house if you like. 
        3. Place your sponge on top of a piece of cardboard and draw around the circumference of it. Now you can cut this oval shape out to use as both a pattern and a part of your pet's bed.
        4. To fashion the sides of the pet bed, cut a one inch strip of cardboard out and round off the corners a bit.
        5. Now tape and paste this strip to the outside edge of the cardboard base to form the side. Let this dry. Make sure to leave a space around one half of the pet's bed without a side. This will make the bed easy to get in and out of. (shown just right)
        6. Set your sponge onto the wrong side (A sewing term that means backside.) of the calico you have selected. Draw with a pencil around the edge of the sponge on top of the fabric. Now draw a second line approximately 2 inches away from this shape. You need to cut your fabric just a little bit larger than the actual sponge so that you can wrap the fabric and tape it in place over the top half of the sponge.
        7. Don't worry about wrapping your pieces to look clean where you will be putting hot glue anyway. 
        8. Now, wrap the cardboard pet bed in the same way, taping down the left over corners down to the inside interior of the bed. (see photo below)
        9. Hot glue the covered sponge into the covered pet bed frame. 
        10. Hot glue a oval piece of felt to the bottom of your pet's bed. (see photo below)
        11. Hot glue on four beads for feet. (see photo below)
        12. Sew seams down around the bed's wrapped edges if necessary.
        Right, see how messy the inside of this bed looks! But, I'm going to hot glue the covered sponge over this, so it's o.k.
        if it's a bit messy! Center, I have hot glued the matching felt to the bottom of each pet bed and this covers up the tape
        used to wrap the bottom edges with fabric. Then I glued four beads on the bottom to act as 'legs' for the pet beds.
        Right, my finished projects. I used a needle and thread to sew the seams down as well.

        The doll's dog sleeps in the blue and green bedroom so we've selected a coordinating calico print to trim out his bed.
        The dog is made from chenille stems. You can learn how to make one similar to mine by visiting Art Education Daily.

        Tuesday, June 26, 2018

        Make a pom-pom doll house rug

        June 26, 2018 0 Comments
        A finished pom pom rug for a doll's house.
               What doll wouldn't enjoy such a fun, bumpy rug to decorate her home with? 
               This little miniature doll house rug is a simple and entertaining first sewing project for a nine to ten year old student.
               He or she will need to learn how to thread a needle and control it while stringing together a whole fist full of colorful pom-poms.

        Supply List:
        • multiple colored, small pom-poms
        • needle and thread
        Step-by-Step Directions:
        1. First you will need to select a colorful thread and needle to work with. 
        2. Thread the needle and knot the end of your thread so that thread will get caught up inside your first pom-pom. This requires a bit of trail and error. Sometimes the threads will not catch properly as you string the pom-poms and you will need to repeat the process. 
        3. Soon you will have a long string of pom-poms to wind up together. 
        4. Work your threaded needle between the chain of pom-poms, from side to side so that these butt up next to each other to form a soft round rug.
        5. As you work, you may need to sew in a loose pom-pom here and there to make the rug stiffer.
        6. The more pom-poms you add, the bigger the miniature rug becomes! Measure it against a doll's chair, sofa, or even a bed in order to determine just how large you would like the rug to be.
        7. Work the threaded needle back and forth into the last pom-pom on the chain before trimming the needle off the thread.
        These are miniature pom-poms that you can purchase from most any dollar store or hobby shop.

        Older kids may like to try making a life-sized pom-pom 
        rug for their room after successfully finishing the 
        miniature project above.

        Monday, June 25, 2018

        Crafting burlap coffee bean bags and purchasing a burr mill...

        June 25, 2018 0 Comments
        Pretend burlap bags are stuffed with cotton and used for play
        in a children's market stall.
               Our family nursery has so many old-world props for grandchildren to play with while learning about Midwestern history and culture. Below are directions for making very simple burlap bags to contain pretend food stuffs like coffee, flour, potatoes and rice. And I have also purchased a coffee grinder at resale for $3.00 to teach the kids how coffee and flour were processed in small amounts prior to the invention of electric grinders.
               Burlap is processed from jute or hemp. Before the Civil War, my family farmed hemp in Missouri. Hemp is like the industrial version of jute. Hemp was sometimes used to make bags for storing and transferring all kinds of food product to market. It is most often used now to make rope and durable carpets. Jute, which is a similar plant, was used to make fabric for ticking (a utility fabric). Over time, paper bags, tin cans and foil bags replaced burlap in the shipping and storing of coffee to the general public, because these were much cheaper to manufacture.
               Although the early burlap bags were printed in mass manually with the use of a silk screen, our simple process will achieve a similar result with art supplies easily found in every American home.

        The coffee grinder in our family nursery is new but it's design
        dates back to those burr mills manufactured just after The
        Civil War. It is one of many interesting kitchen tools that is
        displayed in my old-fashioned, play kitchen.
         Supply List:
        • Off-white burlap fabric, 3/8 yard (Use scraps if you have them instead)
        • a black permanent Sharpie marker with a wide tip
        • dental floss
        • embroidery needle
        • heavy twine or a red yarn alternative
        • a plastic bag or tin foil
        • cotton batting
        • paper grocery bag with red printing (optional)
        Step-by-Step Instructions:
        1. Cut the burlap to whatever size you would prefer for this easy sewing craft. Mine are approximately 12" x 6".
        2. Use a sheet of plastic or tin foil to protect whatever drawing surface you wish to work on top of. This is because the weave of burlap is very loose and the permanent ink marker may transfer to the surface beneath the burlap while you are lettering your design.
        3. I drew my letters with a soft number 2 pencil before tracing over these with a black, permanent ink marker.
        4. It's important to use a wide tip marker so that this tip will stand up to the rough surface of the burlap while you press into it.
        5. It is also important to work on top of a off-white colored burlap in order for your ink based lettering to show up well.
        6. I also added a few, small coffee bean graphics to my sample, burlap bag shown above. I also stapled a strip of paper trim to the rice bag version, just to add a bit of color to it.
        7. Sew around the circumference of of each bag several times with a machine straight stitch, leaving a big enough opening to turn the bag right sides out.
        8. Stuff your bags with cotton batting and then use a whip stitch with dental floss to seal them up. This floss is very durable and will keep the loose burlap threads tightly bound together.
        9. Now add a bit of red thread trim using an embroidery needle if you'd prefer.
               Burr mills were commonly used in early American kitchens. A burr mill, or burr grinder, is a mill used to grind hard, small food products between two revolving abrasive surfaces separated by a distance usually set by the user. When the two surfaces are set far apart, the resulting ground material is coarser, and when the two surfaces are set closer together, the resulting ground material is finer and smaller. Often, the device includes a revolving screw that pushes the food through. It may be powered electrically or manually.
               Burr mills do not heat the ground product by friction as much as do blade grinders ("choppers"), and produce particles of a uniform size determined by the separation between the grinding surfaces.
               Food burr mills are usually manufactured for a single purpose: coffee beans, dried peppercorns, coarse salt, spices, or poppy seeds, for example. Coffee mills are usually powered by electric motors; domestic pepper, salt, and spice mills, used to sprinkle a little seasoning on food, are usually operated manually, sometimes by a battery-powered motor.

        Left, The first coffee-grinder patent in the United States was issued to Thomas Bruff, Sr. in 1798.
         Right, English and French coffee grinders in the nineteenth century.
        The photograph above shows coffee grinders or burr mills kept in a Museum in Wisconsin.
        The photo itself was taken in 1873. On the far right you can see a burr mill similar to the one
        we have on display in the Grimm nursery.

        If you like, you could add stenciled images to your burlap bags.
        This process achieves a similar effect to those older designs 
        using a silk screen, without the equipment needed to develop 
        that printing process.

        Saturday, June 23, 2018

        Sew A Security Blanket for A Baby Doll

        June 23, 2018 0 Comments
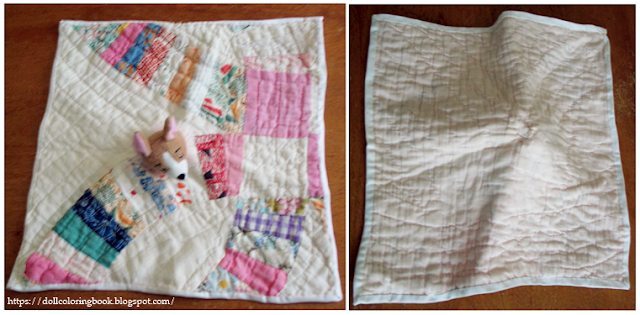
        This baby doll has a kitten security blanket.
               Here is a simple craft that a older brother or sister will enjoy making for the birthday, Christmas stocking, or even an Easter basket of a younger sibling. Teach them a few basic hand stitches: a straight stitch and a whip stitch to complete the project. But you may need to supply enough materials to make more than just one, just encase they need one for their own growing collection of sewing samples.

        Supply List:
        • small stuffed animals with heads measuring 1-2 inches across
        • A variety of fabrics with interesting, soft, patterns. 
        • Matching threads
        • Needles and scissors
        • matching ribbons, trims, etc...
        Step-by-Step Directions:
        1. Cut off the head of your small stuffed animal leaving a 1/4 inch to turn under with a needle.
        2. Cut two 12"x12" swatches per security blanket.
        3. Position the animal head approximately in the center of one swatch. Make sure that swatch has it's best side facing up where the head will be sewn on top.
        4. Now whip stitch around the neck of the stuffed head, turning 1/4 inch of it's edge under as you sew.
        5. Sew around the head twice so that it is firmly attached.
        6. Turn the wrong sides of both swatches together, one with an attached head and the other without, and sew a 1/4 inch seam around all the edges leaving 2-3 inches open before turning the two sides inside out. 
        7. Use an invisible stitch to close up the opening between the two fabric swatches.
        8. Attach ribbons and fur trims for collars.
        Left, I purchased a bag of tiny stuffed animals at the flee market for a few dollars. Right,
        the heads have been cut from their bodies so that they may be attached to doll blankets.
        Left, the top half of a doll's security blanket. Right, the bottom half of a doll's security blanket.
        You may choose to make your doll's security blanket from a furry, metallic, or flannel fabric.
        Left, a close up of the chihuahua head. Right, a side view of the chihuahua security blanket.
        My youngest daughter's childhood doll holds a quilted security blanket with a chihuahua head.
        A red head baby doll cuddles her boxer puppy security blanket.
        This baby doll  holds a unicorn security blanket.
        Similar Crafts:

            Thursday, June 21, 2018

            Applique Small Potholders for A Play Oven

            June 21, 2018 0 Comments
            I paid only ten cents for these little, child sized potholders in an estate sale. 
            Each revealed bright colors after giving them a good scrub. Then, I decided 
            they needed a bit of decoration. So I cut a flower, cherries and strawberry 
            from a bit of felt and appliqued the designs with hand-stitching. 
            With just a few finishing touches (pom poms and seed beads) this 
            project was finished in under an hour.
            Left, Vintage print fabric potholders in bold colors: blue, green, yellow and red 
            will look sweet with our kitchen oven in the playroom. Right,  
            an old-fashioned woven potholder made with loops came with the set. 
            It is color coordinated with the quilted potholders.
            I cut simple shapes of both a strawberry and cherries for my appliques. Then I cut 
            brown stems and green leaves from felt. After sewing the designs directly onto the 
            tops of my potholders, (using a blanket stitch ) I then attached a few black seed
             beads to my strawberry to mimic real seeds.
            I printed a 1930s flower design from my Christmas blog and cut it out to use 
            for the applique seen above. I used a finer thread to attach the pom poms and 
            seed beads to the center of my design. You obviously don't need to worry about 
            plastic or furry trims when decorating pretend potholders!

            More Quilting and Applique Crafts for Kids:

            Follow Us @soratemplates